SPIPOLL
Created by the French Office for Insects and their Environment (OPIE) and the Muséum National d’Histoire Naturelle, Spipoll (standing for Suivi Photographique des Insectes POLLinisateurs) aims to obtain data on pollinating and/or floricultural insects by monitoring them photographically. The data are collected using a simple and attractive protocol using photographs of insects as they forage. The photographs make it possible to measure variations in their diversity throughout metropolitan France.
This requires collecting data from a large number of sites in a variety of environments. The more who participate, the more information scientists will have on the relationships between floricultural insects and agricultural practices, the effect of landscape fragmentation and global warming.
Have a look on the presentation video:
The protocol:
-
Photography. The protocol consists of choosing a single flower and photographing all the insects that land on it over a 20-minute period. If the plant has several flowers, don’t move more than five meters from the location of your first photo, or you may lose track of the flower you’re focusing on. You should also take a close-up of the flower and a leaf as well as a wider shot of the whole plant. Finally, remember to photograph the environment in which you find yourself.
You can work on a flower in groups of two or three pupils but only one should take photos so as not to alter the protocol. If pupils take turns, only the most abundant insects risk being photographed.
The other pupils can fill in the field sheet, draw the plant or diagram its location, which will be useful for data entry. We recommend that you assign the tasks to each pupil before going into the field to avoid forgetting anything.
-
Take notes on the environment. On your field sheet, don’t forget to record:
- date and time;
- type of cloud cover;
- wind;
- temperature;
- type of habitat;
- number of individuals per species. -
Identify the insects. Back in the classroom, your students should only keep one or two photos of each insect observed. Then they should identify it using the online identification key. In the same way, the photos of plants will allow for identification online. These identification tools are available with the data entry form at our website: vigienature-ecole.fr.
Let’s begin by having a look on these documents:
- The participant's kit which provides all the tools you will need to be part of this journey, such as the (printable!) identification key,
- The observatory's poster.
When to participate?
You can observe insect pollinators and send us your data throughout the year. But you will have a better chance of encountering pollinators in spring (from April onwards) on a sunny, mild day with not much wind.
What should I do before?
Learn how to use your macro setting:
Have your pupils practice using camera macro settings in class (possibly with an art colleague) so that they don’t end up with blurry photos!
Stake out familiar plants:
In order not to overload the online recognition session, it is best to focus on the insects. The easiest way to do this is to direct your pupils to plants that you are familiar with and can name. Remember to choose plants that are attractive to insects, such as lavender, for example, so that there will be many observations.
Become familiar with the protocol:
To be sure not to forget anything in the field that could later prevent data entry, we recommend that you present the protocol to your pupils in class along with the field sheet.
Getting your pupils ready!
You can also use the photo quizzes available on our website.
Materials you’ll need (per group of 2-3 pupils)
- 1 camera (with macro setting),
- The field sheet,
- 1 thermometer (optional),
- The identification key.
A few precisions
What kind of camera should you use?
You can use any digital camera with a macro setting. The use of a smartphone or tablet is possible, but the quality of the photos and the speed of the camera must be tested beforehand so that photos of moving insects are sharp.
Why is it necessary to stay 20 minutes in front of a flower?
The protocol requires 20 minutes in front of a flower so that statistics can be compiled from the data collected (with the same observation time and comparable "observation pressure"). Twenty minutes is an acceptable length of time for the participants while giving researchers a good view of pollinator diversity.
What if my plant is not on the list?
Unfortunately, not all flowering plants in France are referenced in the determination key. If the plant you are interested in is not present, don’t panic! A field for entering your plant is available after "You know a more precise name". You can then choose at the very end of the drop-down list "taxon not included in the key".
Concerning your photographies
This protocol aims to provide at least 1 picture of each specimen you identified as a “species”. Please pay attention to your picture’s quality (which must be good enough to confirm that this specimen differs from the other ones). Any doubt? Take a picture anyway, you will therefore be able to double-check your first feeling later. For each species you have photographed, further information will be asked: is there only 1 individual? Between 2 and 5? More than 5? Back in the classroom, we advise you to sort your photos in order to select only one picture per species. Crop them, ensuring that the whole insect stands in the middle of the picture, its head at the top.
Few information about species’ determination
To make it easier to identify insects in the computer room, we suggest that you observe them closely in the field using, for example, this list of criteria. Please note that in order not to make a mistake when determining the insects, one form must be filled in for each insect.
For plants, feel free to use this app!
Sending your observations
It will take only a few minutes! Log in and enter your data on vigienature-ecole.fr. Please, let us know if you did not see any individuals: this is important information for our researchers! Do not forget to provide some context, such as the type of environment (urban, rural?) or the use of phytosanitary products. All these data are likely to explain the insects’ distribution over time and space (observation area). This step, yet mandatory, will be asked only once for each area. Please find here all the information you will need to collect prior to the class session.
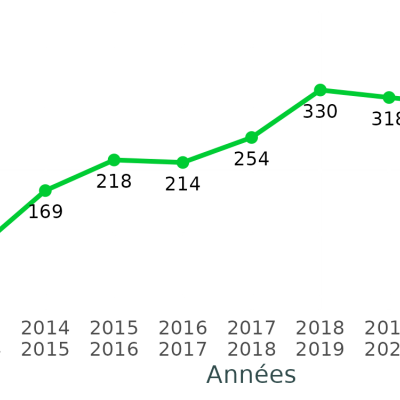
You may find that questions and hypotheses concerning the distribution of living beings arise from your observations (are there as many birds in the city as there are in the countryside? Does the use of pesticides have consequences on snails, etc.). The data positioning tools included in the participation report, which is sent at the end of the school year to all who are registered on the website, provides answers to some of these questions. The graphics included in the report position the observations made in a given establishment in relation to the data collected as a whole. For example, you will learn whether observing 4 species of snails in an establishment is a sign of healthy or poor biodiversity. Explanations are provided to help you interpret the results. These documents encourage your pupils to consider which actions could be taken to promote biodiversity in the courtyard or playground (installation of feeders, setting aside plots of land, etc.).By repeating the observations, you will be able to monitor the impact of these actions over time.
You can also process the data you’ve collected in other ways. For example, you can create graphics representing the species present in different areas of the establishment. These graphics allow pupils to visualize in a simple manner that there is a significant difference between two areas of the schoolyard. They can then propose hypotheses to explain the population differences (abiotic factors such as humidity, temperature for example).
You can also produce graphs showing the evolution of the number of species present seasonally. They allow you to follow changes in the number of individuals over the course of the year (for example, for the notion of bird migration). It is also possible to produce such graphs over several years by accumulating the numbers recorded month by month.
Many other illustrations are possible. For example, pupils can be asked to situate their data on an aerial photo of the school. They can then offer explanations for possible differences in the occupation of the various areas of the school.
Finally, you will find a wide range of educational activities on our website. Some of them are suggestions for introducing this activity but others take it a step further. For example, we have developed ways for your pupils to learn how to analyze data in the manner of an ecological researcher, or for them to think about actions to be taken within their establishments to promote biodiversity.
Protocole spipoll : Spipoll
Pedagogical tipsHere are some suggestions for activities that can help you integrate this observatory to your educational progress.
-
Icone
 TitreCréer une station météo en ArduinoDescriptionCycle 4 - LycéeTexte
Nous vous proposons dans cette activité de permettre à vos élèves de fabriquer, avec votre collègue de technologie, des capteurs qui permettent de faire des mesures de l’environnement (températures, humidité…).
-
Icone
 TitreFavoriser la biodiversité de son établissementDescriptionCycles 2, 3 et 4 - LycéeTexte
Avec cette activité, les élèves vont pouvoir comparer les insectes présents dans la cour de l’établissement à ceux cités dans un texte de Jean Henri Fabre en 1903.
-
Icone
 TitreHypopothèseDescriptionCycles 3 et 4 - LycéeTexte
Dans ce jeu les élèves doivent concevoir un protocole de collecte de données. Le protocole choisi pour la durée du jeu aura une influence sur le nombre de données collectées, sur leur qualité et donc sur les résultats scientifiques !
-
Icone
 TitreÉtudier la biodiversité en aide personnaliséeDescriptionLycéeTexte
Ce document présente un exemple de séquence en aide personnalisée autour du Spipoll, elle montre l’intérêt des sciences et de l’anglais dans différentes filières.
-
Icone
 TitreLes relations plantes insectes pollinisateursDescriptionLycéeTexte
Avec le Spipoll, les élèves découvriront que tous les insectes ne fréquentent pas toutes les fleurs, ce sera donc l’occasion d’aborder la notion de coévolution.
-
Icone
 TitreAnalyser des données pour évaluer l’urbanophobie chez les insectes pollinisateursDescriptionCycle 4 - LycéeTexte
Cette activité reprend le cheminement qui a été mené par des chercheurs pour une étude scientifique. Nous calculerons l’affinité des insectes pollinisateurs pour évaluer l’impact du milieu urbain.
-
Icone
 TitreImpact de la météo sur la fréquentation des insectesDescriptionLycéeTexte
Cette activité propose l'exploitation statistique d’une base de données avec un tableur pour évaluer l’impact des conditions météos sur la fréquentation des insectes
-
Icone
 TitreAnalyser des donnéesDescriptionCycle 4 et LycéeTexte
Avec Vigie-Nature École, vous collectez des données sur la biodiversité dans votre établissement. Ces données seront utiles aux chercheurs mais vous pouvez également les exploiter en classe. Nous vous proposons plusieurs pistes pour cela.
-
Icone
 TitreCréer une clé de déterminationDescriptionDu CP à la terminaleTexte
Ce tutoriel vous présentera comment créer simplement une clé de détermination avec le logiciel OpenKeys. Vous pourrez, par exemple, créer de clés référençant uniquement les espèces présentes dans votre région.
-
Icone
 TitreBiodiversity and human impact on pollinating insectsDescriptionHigh SchoolTexte
This activity aims to get your students to construct a definition of biodiversity and then to use the example of pollinating insects to understand the consequences of human activities.
-
Icone
 TitreLa fête des lilas au printempsDescriptionCycles 3 et 4Texte
Avec cette activité, les élèves vont pouvoir comparer les insectes présents dans la cour de l’établissement à ceux cités dans un texte de Jean Henri Fabre en 1903.