Operation Snails
Noé and the National Museum of Natural History have launched Operation Snails! It is way simple: pupils are asked to look for snails and slugs within their schoolyard and playground. We then invite them to identify the different species they were able to find in order to forward these observations to the researchers. Being part of this observatory, you will help the scientists to gain insight on the importance of these green spaces and their management for both snails and slugs. No need for malacology expertise! We provide here all the tools you will need not only to count them but also to identify them. All your observations are important, we’re counting on you!
Have a look on the presentation video:
The protocol:
- Place a wooden board on the ground. The wood must be raw, unvarnished and untreated (do not use plywood or pallet wood). Each side of the board should be from 30 cm to 50 cm long (e.g. your board could be a 40 cm x 40 cm square), with a minimum thickness of 1.5 cm. Raise one side of the board with a stone or a piece of wood so that larger species can also crawl underneath for shelter. Remember to remove the shells of dead snails so as not to skew the counts. You’ll then need to wait at least one month (or longer if you wish) before lifting your board and taking inventory of the snails.
-
Identify and count snails, slugs and other small animals! During the counting periods, on a day with mild weather, lift your board to make your count. If you find any empty shells, count those too and then remove them so you don’t count them again next time. Repeat your count every month, if possible.
- Replace the board in the same place.
Let’s begin by having a look on these documents:
- The participant's kit which provides all the tools you will need to be part of this journey, such as the (printable!) identification key;
- The observatory's poster;
- A quick information note you can stick on your board.
When to participate?
All year round, but you probably won’t see many snails, if none, in winter. You don’t need to take counts every month.
What should I do before?
Define where you are the most likely to find a lush diversity and abundance of snails and slugs. Remember to place the board(s) at least one month before the activity with your class, preferably a location that is not easily accessible to the pupils. Don’t hesitate to lay several boards, and why not in a variety of settings (lawn, hedge...) to be able to make comparisons with your pupils. Lastly, to boost your chances of spotting snails, you can place your boards on the north side of an obstacle (tree, building...).
Getting your pupils ready! Don’t hesitate to collect empty snail shells so you can teach your pupils to identify them in the classroom and make the field session all the easier! You can also use the photo quizzes available on our website.
Materials you’ll need (by group of 3-4 pupils)
- 1 wooden board to be placed at least a month before the day of the count,
- 1 hand magnifier,
- the participant's kit,
- 1 camera (optional).
A few precisions
Why place wooden boards to observe snails?
Snails and slugs like damp places. When it rains, the wood of your boards absorbs water, providing an excellent moist shelter for snails in dryer weather.
Which wood should I choose for my boards?
Your boards must be made of unvarnished, untreated raw wood (no plywood or pallet wood). Varnishes, glues and other treatments can modify the porosity of the board and potentially have a repellent effect on the snails. The type of wood seems to influence the presence of gastropods: pine boards, for instance, are less appealing to snails than those made of poplar.
Why wait a month?
Snails are slow movers, so it takes them a while to settle under your boards (sometimes you may have to wait more than a month). Once installed, you can leave your boards where they are as long as you like.
Few information about species’ determination
In France, there are hundreds of different species of snails. Some of them are really small and hard to identify. Operation Snails aims to focus on 31 species only, chosen for their size (more than 5 mm). These species are also the most likely to be found next to dwellings. The participant’s kit provides an identification key that will help you and your pupils to recognize and name the different species.
Sending your observations
It will take only a few minutes! Log in and enter your data on vigienature-ecole.fr. Please, let us know if you did not see any individuals: this is important information for our researchers! Do not forget to provide some context, such as the type of environment (urban, rural?) or the use of phytosanitary products. All these data are likely to explain the snails’ distribution over time and space (observation area). This step, yet mandatory, will be asked only once for each area. Please find here all the information you will need to collect prior to the class session.
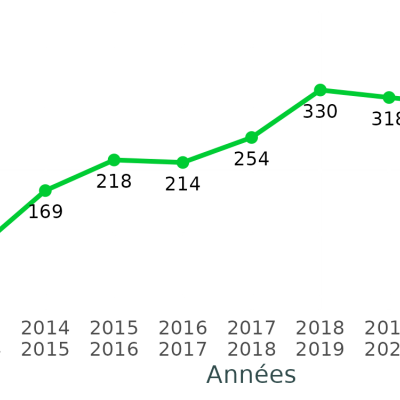
You may find that questions and hypotheses concerning the distribution of living beings arise from your observations (are there as many birds in the city as there are in the countryside? Does the use of pesticides have consequences on snails, etc.). The data positioning tools included in the participation report, which is sent at the end of the school year to all who are registered on the website, provides answers to some of these questions. The graphics included in the report position the observations made in a given establishment in relation to the data collected as a whole. For example, you will learn whether observing 4 species of snails in an establishment is a sign of healthy or poor biodiversity. Explanations are provided to help you interpret the results. These documents encourage your pupils to consider which actions could be taken to promote biodiversity in the courtyard or playground (installation of feeders, setting aside plots of land, etc.).By repeating the observations, you will be able to monitor the impact of these actions over time.
You can also process the data you’ve collected in other ways. For example, you can create graphics representing the species present in different areas of the establishment. These graphics allow pupils to visualize in a simple manner that there is a significant difference between two areas of the schoolyard. They can then propose hypotheses to explain the population differences (abiotic factors such as humidity, temperature for example).
You can also produce graphs showing the evolution of the number of species present seasonally. They allow you to follow changes in the number of individuals over the course of the year (for example, for the notion of bird migration). It is also possible to produce such graphs over several years by accumulating the numbers recorded month by month.
Many other illustrations are possible. For example, pupils can be asked to situate their data on an aerial photo of the school. They can then offer explanations for possible differences in the occupation of the various areas of the school.
Finally, you will find a wide range of educational activities on our website. Some of them are suggestions for introducing this activity but others take it a step further. For example, we have developed ways for your pupils to learn how to analyze data in the manner of an ecological researcher, or for them to think about actions to be taken within their establishments to promote biodiversity.
Protocole escargots : Snails operation
Pedagogical tipsHere are some suggestions for activities that can help you integrate this observatory to your educational progress.
-
Icone
 TitreFollowing Darwin's approach with the example of snailsDescriptionHigh SchoolTexte
In addition to participating in this participatory science programme, students will try to understand how to reconstruct Darwin's approach based on this group of species.
-
Icone
 TitreBiodiversity and allelic diversity of garden snailsDescriptionHigh SchoolTexte
In this activity, students will try to understand the impact of green space management methods on the diversity of these species. Finally, they will look at the allelic diversity of one genus of snails: Cepaea
-
Icone
 TitreCreating a weather station in ArduinoDescriptionCycle 4 - High SchoolTexte
In this activity, we suggest that you and your technology colleague enable your pupils to make sensors that allow them to measure the environment (temperature, humidity, etc.).
-
Icone
 TitreNatural selection in hedge snailsDescriptionCycle 4 - High SchoolTexte
The documents provided in this activity show how natural selection and environmental conditions can explain the distribution of phenotypes of the hedge snail.
-
Icone
 TitrePromoting biodiversity in your institutionDescriptionCycles 2, 3 and 4 - High schoolTexte
Thanks to different action proposals, we will see how to promote biodiversity within your school. The Vigie-Nature School protocols will allow us to monitor the impact of these actions on biodiversity.
-
Icone
 TitreHypothesisDescriptionCycles 3 and 4 - High schoolTexte
In this game the pupils have to design a data collection protocol. The protocol chosen for the duration of the game will influence the amount of data collected, its quality and therefore the scientific results!
-
Icone
 TitreWho is who ?DescriptionCycles 3 and 4Texte
The objective of this sequence is to define the notion of biodiversity and then to use the example of snails to study local biodiversity. The work in English makes it possible to approach the identification of snail species in a playful manner.
-
Icone
 TitreA protocol squared!DescriptionCycles 2,3 and 4Texte
This activity aims to illustrate the importance of protocol standardisation and compliance for data validity and analysis.
-
Icone
 TitreAnalyse data to assess the diversity and richness of snails and slugsDescriptionCycle 4 - High SchoolTexte
This activity aims to show how the Museum's scientists use the data collected during Operation Snail.
-
Icone
 TitreLand Art activityDescriptionCycles 2 and 3Texte
With Vigie Nature School, field trips allow students to work on science but also on plastic art with Land Art. This approach will contribute to raising awareness of biodiversity by allowing them to observe and manipulate it.
-
Icone
 TitreDiscovering "invisible" living beingsDescriptionCycles 3 and 4Texte
The snails presented on a document illustrating current biodiversity were not observed during a local outing. How can this be explained? In this sequence, the pupils will examine the influence of the naturalness of the environment on these species.
-
Icone
 TitreCreate a determination keyDescriptionFrom CP to TerminaleTexte
This tutorial will show you how to create a simple determination key with the OpenKeys software. You can, for example, create keys referencing only the species present in your region.
-
Icone
 TitreBiodiversity in the city...DescriptionHigh SchoolTexte
This activity combines a field trip to set up the Vigie-Nature School protocols and documentary research to understand the place of biodiversity in our cities.
-
Icone
 TitreHuman influence on the settlement of environmentsDescriptionCycles 3 and 4Texte
Are the snails living in the park next door the same as those found in the college? What about other schools in the region? And what is the human impact on these species?
-
Icone
 TitreOn the trail of the snailsDescriptionCycle 2Texte
Observing snails in a terrarium can lead to questions about snails living in the pupils' immediate environment: the school. Which snails can be observed there? Are there many of them, where do they live?
-
Icone
 TitreThe snails of my schoolDescriptionCycles 3 and 4Texte
This activity proposes to discover an often unknown biodiversity by implementing the "Operation Snail" protocol.
-
Icone
 TitreDefining the concept of species with snailsDescriptionCycle 3Texte
The aim of this activity is to get the pupils to work on the scientific approach using the example of snails. The pupils will have to make hypotheses on the notion of species and will have to carry out a scientific classification.
-
Icone
 TitreAnalysing dataDescriptionCycle 4 and High SchoolTexte
With Vigie-Nature School, you collect data on biodiversity in your school. This data will be useful to researchers, but you can also use it in class. We suggest several ways to do this.